
How to Cut a New Window Opening in a Wood-Frame Wall with Siding
- Support Team

- Apr 22
- 5 min read

Adding a new window to a wood-frame wall is one of the most effective ways to transform a dark room, improve ventilation, and increase your home’s value. However, unlike hanging a picture or painting a room, this project involves structural modification that requires precision to maintain the safety and integrity of your home.
Quick Answer: Learning how to cut a new window opening in a wood-frame wall with siding requires a specific sequence of structural and waterproofing steps. To do it correctly, you must:
Verify if the wall is load-bearing to ensure structural stability.
Locate and reroute hidden electrical, plumbing, or HVAC lines.
Cut the interior drywall and exterior siding to the precise rough opening size.
Install a structural header supported by king and jack studs to redistribute weight.
Flash the opening with a sill pan and Z-flashing to prevent water damage before installation.
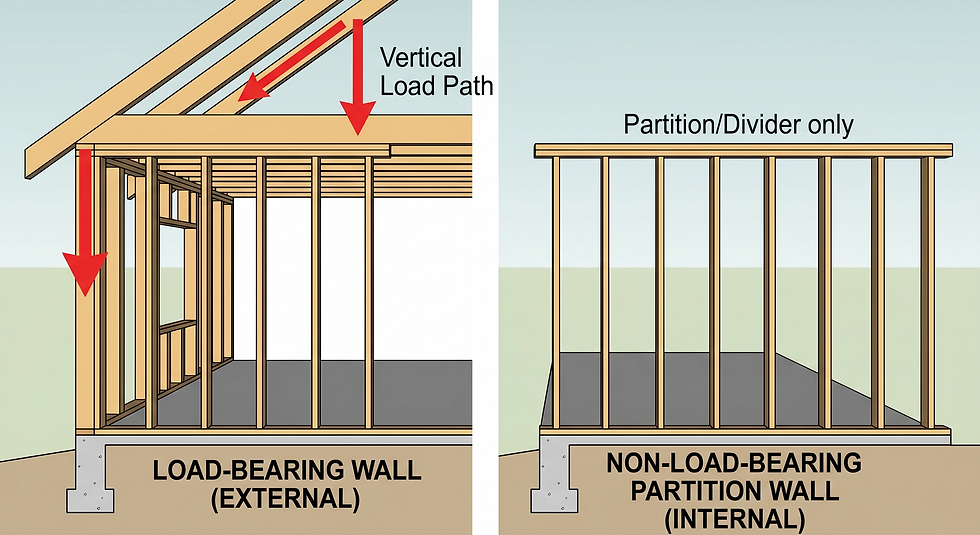
1. Pre-Project Assessment: Load-Bearing or Not?
Before you pick up a saw, you must determine if the wall supports the weight of the roof or the floor above it. In wood-frame construction, most exterior walls are load-bearing.
Cutting into a load-bearing stud without a temporary support system can cause the ceiling to sag or, in extreme cases, lead to structural collapse.
Check Joist Direction: If the floor or ceiling joists run perpendicular to the wall, it is almost certainly load-bearing.
Structural Reality: Professional installers use structural scanners and blueprints to verify load paths because even "non-load bearing" walls can sometimes provide lateral stability to the home's frame. If you see a double top plate at the top of the wall, treat it as load-bearing to be safe.
2. Locating Utilities
A wall is rarely just wood and insulation. It is a conduit for your home’s vitals. Before cutting, you must perform a "utility sweep":
Electrical: Check for outlets, switches, or hidden junction boxes on both sides of the planned opening.
Plumbing: Look for vent pipes or water lines, especially if the wall is shared with a kitchen, bathroom, or laundry room.
HVAC: Ensure there are no return air ducts or supply stacks in the stud bays you plan to remove.
3. Installing Temporary Structural Support
If you are cutting into a load-bearing wall, the weight of your roof or second floor doesn't just "wait" for you to finish framing. Without support, the top plate can sag the moment you cut a stud, making it impossible to slide your new header into place.
The "I-Beam" Method: For wider openings, we recommend building a temporary "dead-man" wall or an I-beam using 2x6 lumber.
Placement: Position this support roughly two feet inside the house, parallel to the wall you are cutting.
The Wedge: Use 2x4 "jack" posts wedged tightly between the floor and your temporary beam to take the tension off the exterior wall studs.
Pro Tip: Always place a scrap piece of lumber on the floor and ceiling to distribute the pressure. This prevents your temporary support from punching a hole through your finished flooring or drywall.
4. The Structural Framing Process
To make a window opening bigger or create one where there is none, you cannot simply remove studs. You must redistribute the weight of the house around the new hole.
The Anatomy of a Window Opening:
The Header: A horizontal beam that carries the load over the window. Its size depends on the width of the opening and the weight above it.
King Studs: Full-length studs that run from the bottom floor plate to the top plate.
Jack Studs (Trimmers): Studs nailed to the king studs that support the ends of the header.
Rough Sill: The horizontal piece at the bottom of the window frame.
Modern building codes typically require a double-king and double-jack configuration for wider openings (over 5 feet) to ensure the weight is properly transferred to the foundation. This is a critical safety step that ensures your home doesn't shift over time.

5. How to Cut a New Window Opening in a Wood-Frame Wall with Siding: The Exterior Process
Whether your home has vinyl, wood, or fiber-cement siding, the cut must be precise to allow for proper flashing and trim.
Level and Square: Mark your rough opening from the inside, then drill pilot holes through the corners to the outside to ensure the exterior cut aligns perfectly with the interior frame.
The Cut: Use a circular saw with a blade appropriate for your siding material (e.g., a diamond blade for fiber cement).
Waterproofing: This is where most DIY projects fail. Proper "Z-flashing" and sill pans are required to prevent rot inside your walls. Even a 1/16-inch gap in flashing can lead to thousands of dollars in water damage over time.
6. Waterproofing: The "Shingle" Flashing Method
In the world of window installation, we have a saying: It’s not if water gets behind the siding, but when. Proper waterproofing ensures that when moisture enters, it has a clear, unobstructed path back to the exterior.
The Sloped Sill Pan: We start by installing a beveled piece of siding or a pre-fabricated sill pan at the bottom of the opening. This creates a slight outward pitch, so any water that reaches the sill is pulled away from the interior framing by gravity.
Flexible Membrane Flashing: We apply a high-performance, self-healing flashing tape (like ZIP System™ or equivalent) over the sill and at least 6 inches up each side. This creates a seamless, watertight "bucket" at the bottom of your window.
The Shingle Effect: Just like roof shingles, each layer of flashing must overlap the one below it. The side flashing goes over the sill tape, and the top (head) flashing goes over the side tape.
The DIY Reality: Why Precision Matters
While a wood-frame wall is more forgiving than brick or concrete, the margin for error is slim. A mistake in header sizing can lead to cracked drywall, "stuck" windows that won't slide, and compromised structural integrity. Furthermore, improper flashing often results in mold growth that remains hidden for years.
The Risks of DIY Structural Modification:
Permit Issues: Most jurisdictions require a building permit for structural changes. Unpermitted work can complicate a future home sale or insurance claims.
Warranty Voids: Many high-performance window manufacturers will not honor warranties if the rough opening is not square or if the unit was not flashed to industry standards.
Physical Safety: Managing a heavy structural header alone is physically dangerous and increases the risk of a framing failure.
Why XP Windows and Doors is the Safer Choice
Cutting a hole in your home is a high-stakes project. At XP Windows and Doors, we don't just "install windows", we manage the structural integrity of your home. Our team handles the permits, the load-bearing calculations, and the complex waterproofing that keeps your home safe and energy-efficient.
Save your weekend for the finish work and let the experts handle the heavy lifting.


Comments